In the next two blog articles is described how to setup gradle to run acceptance tests in a specific gradle task. Two different frameworks will be used writing these tests. The first article describes the setup wit Gradle and Fit. The second article describes how the setup and write them with Cucumber.
Expected knowledge base
- Gradle and Gradle project structure
- Git and Github
- Java, JUnit, Mockito
Basic setup
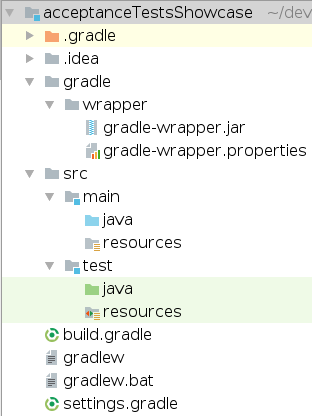
At first a new empty Gradle project is needed. After the setup the structure should look like this:

It is recommended to start with a build.gradle like this:
apply plugin: 'java'
apply plugin: 'eclipse'

repositories {
    jcenter()
}

eclipse {
	classpath {
		downloadJavadoc = true
		downloadSources = true
	}
}

sourceCompatibility = 1.8
version = '1.0'

dependencies {
	testCompile 'org.assertj:assertj-core:3.8.0'
	testCompile 'junit:junit:4.12'
	testCompile "org.mockito:mockito-core:2.8.47"
}
It is possible to import this project in eclipse after ./gradlew eclipse and to Intellij, which should auto-build the Gradle project.
Also a minimal dependency set for creating Unit-Tests is still described although they won’t be in scope for this article.
Instead the next sections will cover how to setup the project for creating Acceptance-Tests.
Setup for Fit
At first I will answer a question some readers might have: why Fit, or what is Fit? Fit is an extreme simple and lightweight Acceptance-Testing-“Framework” by Ward Cunningham and the ancestor of FitNesse, a very popular testing framework today. The blog series starts with Fit because it shows best how simple it is to start writing Acceptance-Tests. There is no need for much infrastructure or complex test specification. Instead just a Jar, some HTML files and some glue code to link the test specification with the application is needed.
The first step is to add the jar to the application. Currently it is only hosted at Maven-Central, so it has to be added to the repository specification:
repositories {
    jcenter()
    mavenCentral()
}

[...]

dependencies {
    [...]
    testCompile 'com.c2.fit:fit:1.1'
}
Because Acceptance-tests might be even slower than Unit-Tests a separate gradle build-step for them is created so the tests don’t run while
default gradle build:
Add a new folder under test/-dir named fit. Here the test specification and fixture code is added later.
Because this differs from default gradle project structure, some changes to the build.gradle-file are made.
Declare a new source folder, so gradle compiles the classes placed under src/test/fit, too:
sourceSets {
    integrationTest {
        java {
            compileClasspath += srcDirs 'src/test/fit'
        }
    }
}
Because in productive applications access to the application under test is needed, the new source set is extended by default test classpath:
configurations {
    integrationTestCompile.extendsFrom testCompile
    integrationTestRuntime.extendsFrom testRuntime
}
Now the project is ready to include the new gradle build step to launch the Acceptance-Tests:
task fit(type: JavaExec) {
    classpath = sourceSets.integrationTest.runtimeClasspath

    main = 'fit.FileRunner'

    args 'src/test/fit/alltests.html', 'src/test/fit/alltests-result.html'
}
Because Fit has no gradle runner plugin it is a separate gradle step which executes the fit.FileRunner-class from the Fit-Jar.
Before launching the gradle build step the specified files alltests.html and alltests-result.html are added in the fit test folder created before.
After that the gradle step is launched the first time with ./gradlew fit.
This should lead to following error:
FAILURE: Build failed with an exception.
   ./gradlew fit
   :compileIntegrationTestJava NO-SOURCE
   :processIntegrationTestResources NO-SOURCE
   :integrationTestClasses UP-TO-DATE
   :fit
   0 right, 0 wrong, 0 ignored, 1 exceptions
   :fit FAILED

   FAILURE: Build failed with an exception.
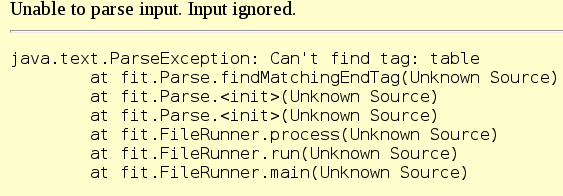
Opening the alltests-result.html in Browser will show that the fit.FileRunner correctly launched , but it was unable to parse the HTML file:

Implement first Fit Acceptance-Test
Copying the following content to alltests.html:
<html>
<head>
    <title> FIT-Tests </title>
    <meta charset="utf-8"/>
</head>
<body>

<h1>Manage DVD store inventory</h1>
<p>Create new title in DVD store. We need title of DVD and price category. The number for every movie is created by system in ascending order.</p>

<table border cellspacing="0" cellpadding="3">
    <tr><td colspan="3">fit.ActionFixture</td></tr>
    <tr> <td> start </td> <td colspan="2"> MovieAdministration </td> </tr>
    <tr> <td> press </td> <td colspan="2"> new movie </td> </tr>
    <tr> <td> enter </td> <td> movie title </td> <td> Pulp Fiction </td> </tr>
    <tr> <td> enter </td> <td> price category </td> <td> regular price </td> </tr>
    <tr> <td> check </td> <td> movie number </td> <td> 1 </td> </tr>
</table>

</body>
</html>
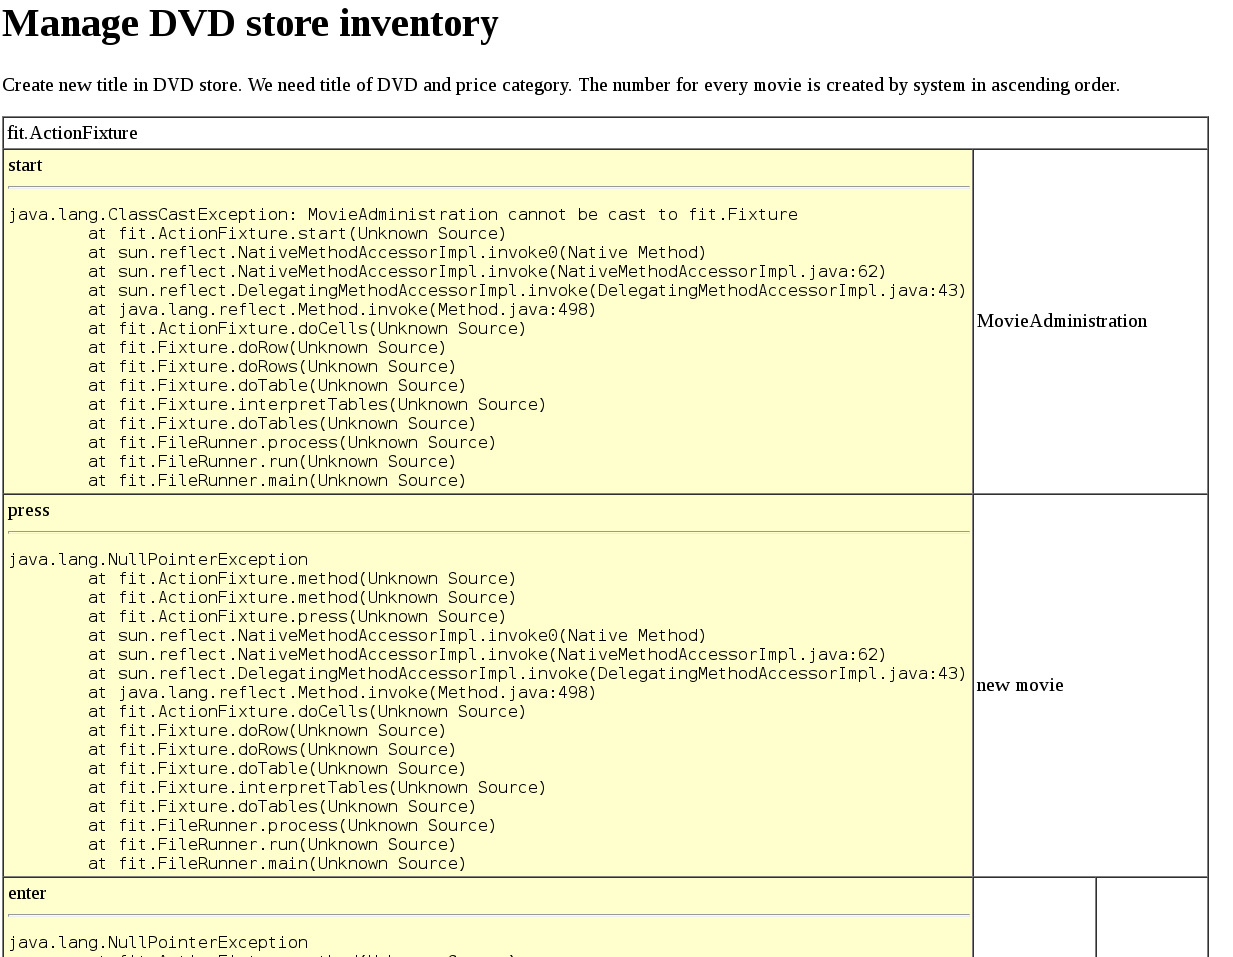
gives the following result, opened in Browser:

The great thing with acceptance test is that it does not need further explanation. The test describes what the task is, every developer should be ready to go after reading the test specification. A DVD Store is created, where a User should be able to add new Movies to the inventory.
I will not go deep to Fit specific things like the fit.ActionFixture, this would be an other complete blog article and Frank Westphal
still wrote a great description (see linked PDF below). In short it is a class from Fit which parses every table row and executes
the specified command from column one. These commands are defined by Fit during the commands in column two are defined by the developer.
It’s time to create the Fixture class where test code is placed. It has to be named ‘MovieAdministration.java’, look row and column two. I always prefer class names specific to the problem domain, because every developer who needs to work with the code is able to find the needed classes when she/he needs to add new behaviour to the code.
After creating the empty Java class execute the tests again.
Still an exception, but one step further; refresh the alltests-result.html page in Browser. It should look like this

The new test class has to extend the fit.Fixture class:
import fit.Fixture;

public class MovieAdministration extends Fixture {
[...]
There are also many NPE, because the specified methods from column two are still not implemented. Add following to the class:
private int movieNumber;
  private String movieTitle;
  private String priceCategory;

  public void newMovie() {

  }

  public int movieNumber() {
    return 1;
  }

  public void movieTitle(String title) {
    movieTitle = title;
  }

  public void priceCategory(String category) {
    priceCategory = category;
  }
Now run tests again. They should succeed now, because the enter rows don’t really test something.
The only test currently existing is the check row. It checks if movie has No. 1. The value is currently returned hard coded.

When changing it the test will fail:

From this point you are ready to write Acceptance-Tests with Fit and launch them in your build pipeline with Gradle. For a deeper look to Fit I recommend the Free PDF from Frank Westphal. It gives a great introduction in Testing Java applications.
For a complete example see github-project.
Please feel free to leave comments. In the next article the setup with Cucumber will be described. Stay tuned!